

You are using an out of date browser. It may not display this or other websites correctly.
You should upgrade or use an alternative browser.
You should upgrade or use an alternative browser.
How to inspect quality of flat roofs
- Thread starter MGee
- Start date
Recoveryone
Well-Known Member
I'm a little late on this thread, but the first thing that jumps out to me is this, are you a certified roofing inspector? No matter how you fly the project, are you qualified to make determinations of workmanship. In the United States, that would mean that you have some type of ICC classification in building construction. For myself, I do construction inspection, but my area of qualification is in CISEC/QSP (which is in Erosion Control field). I could come out and eye ball a roofing job, but I would never sign off or allowing my work to be used as the official determining factor of workmanship. Doing so, open's you and your company up to liability issues that could come back to haunt you later. When flying for mapping purposes, should be you simply providing the data to be used by those that are qualified/certified to make structural analysis of work done.

Recoveryone
Well-Known Member
I did home and commercial inspections, grandson took over the business. At the time I was using a Phantom 4. I would first shoot a video about 50 feet over the roof. Pick out the areas that need a closer look and take photos of those areas. If Possible I would take one photo of the entire roof then mark any problem areas and reference photos of the area.
If you are doing inspections are you certified by someone? If not always call for a professional roof inspection if you see anything, and I mean anything that is suspect. Reason being if you tell the client the roof looks good, and problems are found later, guess what, you get sued. On flat roof pay very close attention to edges where water can accumulate. Get close ups of all flashing and make sure they are installed properly.
I missed this post earlier, but it hits the nail on the head just as what I said also.
Recoveryone
Well-Known Member
Thats odd as ICC is nation wideHere in Florida anyone can inspect a roof without having a roofing license or certification.
2024 International Building Code (ICC IBC-2024) - ANSI Blog
The International Building Code (ICC IBC-2024) overview, development, and changes. It's used or adopted in all 50 states and other nations.
 blog.ansi.org
R.Perry
Well-Known Member
Not all states require an inspector to be licensed. I live in California and no license is required. Most in this state got their training from various schools that teach the trade. The common practice here is if there is any question from foundation to roof of potential problems a licensed professional contractor is recommended to examine the potential problem areas.
Jobee
New Member
When I do roof mapping I am doing just that - mapping. I am guilty of calling it a roof inspection too at times. My contract states I am not a certified roof inspector and that it is the responsibility of the client to work with a certified roofing contractor or inspector. If I am working for a roofer or inspector, they get the report. Once I do the mapping, I do go back and take pictures of suspicious areas and any items requested by the client (drains, attachments etc.). If doing a thermal image, I take pictures of hot spots after the mapping is done.
I also carry E&O insurance and everyone should as well as every job having a contract.
I also carry E&O insurance and everyone should as well as every job having a contract.
The owner of the building I work in is resurfacing the roof, so I thought I would fly a quick “before” ortho. Flown at 96 feet do to nearby trees and I didn’t want to spend time avoiding them, but might give you a reference if a flat gray roof.
 www.dronedeploy.com
DroneDeploy
www.dronedeploy.com
I'm happy to answer questions for anyone that wants to experiment with the software. Recently I created a virtual box image with all the software and prerequisites and libraries all installed and configured. For smaller data sets, running the software in a virtual machine isn't too bad.
To go down this path, you would first need to download and install oracle virtualbox software (free) for your Mac (or PC). The download link should pop up with a quick google search. Then you would need to download and import the actual virtual machine image from here: ImageAnalysis v20200214.ova
It may all sound a little daunting at first (especially compared to the ease of uploading images to drone deploy in the cloud) but my software is all open-source/free so depending on your use case it might help you out -- or you may decide paying for commercial software is the easier path in the long run. Every one's needs and projects are different and we are all here trying to find the best tools and straightest paths to get things done.
Once you have the virtual machine image up and booted, then we could probably talk about how to actually proceed from there. It's not that hard, but the virtual machine is running Linux and the tools are command-line style, so you have to be willing to read some instructions and ask a few questions. The instructions always lag behind the code in these types of projects ... sorry about that.
Disclaimer: this software has been developed out of a university research lab to support our research projects. I have been writing software for > 35 years so in my view these tools are really solid and outperform commercial tools in several areas, but they are presented in a "guts out" style. I use a command line tool model versus the polished GUI you would get from a typical commercial package. The benefit to me is that I can focus on the core algorithms and strategies and I don't get bogged down in look-and-feel and all the endless details that go along with developing a modern GUI app. I also make zero money from other people using the software, and most likely it just burns up my time answering questions, but I do think it would be cool if a few people started experimenting with it, and I'm happy to support that as best as I can.
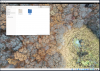
I finally came to installing the virtual machine and installed the imageanalysis v20200214 and see a beautiful background screen from the sky. How can I proceed now?
Attachments
clolsonus
Well-Known Member
- Joined
- Feb 22, 2019
- Messages
- 229
- Reaction score
- 148
- Age
- 58
Hi, I'm happy to help get you started. Is it worth splitting this off into a separate thread so this one doesn't stray off from the original intent? Or should we just keep going here? Are there others interested in following along, or would it be better to take this to private email?
With the switch from working in the office/lab to working from home, I actually need to still download the virtual machine image here so I can give accurate instructions (rather than saying stuff off the top of my head.)
With the switch from working in the office/lab to working from home, I actually need to still download the virtual machine image here so I can give accurate instructions (rather than saying stuff off the top of my head.)
Hi, I'm happy to help get you started. Is it worth splitting this off into a separate thread so this one doesn't stray off from the original intent? Or should we just keep going here? Are there others interested in following along, or would it be better to take this to private email?
With the switch from working in the office/lab to working from home, I actually need to still download the virtual machine image here so I can give accurate instructions (rather than saying stuff off the top of my head.)
Hi, any chance yet to help me out with it? Thanks a lot
clolsonus
Well-Known Member
- Joined
- Feb 22, 2019
- Messages
- 229
- Reaction score
- 148
- Age
- 58
Hi, any chance yet to help me out with it? Thanks a lot
Sorry, it's been hectic here transitioning to working from home and trying to ramp up some online tools to help several conservation crews continue to do meaningful work during this time.
I have setup the same virtual machine on my PC at home now and I'm looking to see if the virtual machine needs any updates. I will probably upload a new version of the virtual machine image with some improvements once I have a chance to check it out here. (hopefully by later today.)
Please don't hesitate to send me polite reminders because I'm juggling a number of things at the same time. But I feel this is important too ... getting other people to test the tools and report any issues helps make the software that much stronger.
Thanks!
Curt.
clolsonus
Well-Known Member
- Joined
- Feb 22, 2019
- Messages
- 229
- Reaction score
- 148
- Age
- 58
I have updated the virtual machine image and uploaded it here:
 drive.google.com
It is setup to work with Oracle Virtualbox. By setting up virutalbox and importing the above linked virtual machine image, you get the software all setup and ready to run (inside a virutal machine.) Other than installing virtualbox, this avoids having to track down and install all the various software components and dependencies on your machine.
Once you do that and boot up (like you did before) try this as a first step:
1. In the terminal window that pops up in the center of your screen, type:
cd Source/ImageAnalysis/scripts
Notice a space after the "cd" command and everything is case sensitive in linux.
2. Launch the visualizer with the little demo project that is bundled on the machine, type:
./explorer.py ztest
Notice the ./ at the start of the command (notice the direction of the slash if you aren't used to linux.) There is a space after the command and before the project name. "ztest" is a directory name that holds the demo project.
This should pop open a blank window, pause for a few seconds or a minute to load all the data (depending on the speed of your host pc) and then you should see an area with some dried up corn, some trees. You can browse around this small data set and get a feel for the visualizer.
If this ends up being nothing like you want to be involved in, or doesn't seem like it will do anything useful for you, then you can bail out now without hopefully having invested too much time.
If it looks interesting (to you or anyone else) we can keep going.
Again, please keep in mind that this code was developed for a research project, so we don't have a team of 2 dozen developers solely focused on polishing and streamlining the user experience ... it's just me and this is just one of my projects. Expect the system to be a "guts out" style ... like running your car with the hood off and not yet painted ... you aren't going to make the cover of car & driver (maybe driver, but not car & driver) but you can still burn rubber around town with it.")
ImageAnalysis v20200331.ova
drive.google.com
It is setup to work with Oracle Virtualbox. By setting up virutalbox and importing the above linked virtual machine image, you get the software all setup and ready to run (inside a virutal machine.) Other than installing virtualbox, this avoids having to track down and install all the various software components and dependencies on your machine.
Once you do that and boot up (like you did before) try this as a first step:
1. In the terminal window that pops up in the center of your screen, type:
cd Source/ImageAnalysis/scripts
Notice a space after the "cd" command and everything is case sensitive in linux.
2. Launch the visualizer with the little demo project that is bundled on the machine, type:
./explorer.py ztest
Notice the ./ at the start of the command (notice the direction of the slash if you aren't used to linux.) There is a space after the command and before the project name. "ztest" is a directory name that holds the demo project.
This should pop open a blank window, pause for a few seconds or a minute to load all the data (depending on the speed of your host pc) and then you should see an area with some dried up corn, some trees. You can browse around this small data set and get a feel for the visualizer.
If this ends up being nothing like you want to be involved in, or doesn't seem like it will do anything useful for you, then you can bail out now without hopefully having invested too much time.
If it looks interesting (to you or anyone else) we can keep going.
Again, please keep in mind that this code was developed for a research project, so we don't have a team of 2 dozen developers solely focused on polishing and streamlining the user experience ... it's just me and this is just one of my projects. Expect the system to be a "guts out" style ... like running your car with the hood off and not yet painted ... you aren't going to make the cover of car & driver (maybe driver, but not car & driver) but you can still burn rubber around town with it.
as a new I got following error when starting up: "The shared folder 'curt' could not be set up: Shared folder path '/home/curt' does not exist on the host."
I can go further and start the virtual machine up, but then I have a (small) issue:
- my MAC keyboard is an AZERTY - so not easy but can work with it
The rests works perfectly! I see the amazing cornfield and can zoom in/out and use cursors to move around - beautiful quality
Yessss! I want to go ahead!!! I feel like a boy in a candy shop - but still with no wallet to buy anything ;-)
clolsonus
Well-Known Member
- Joined
- Feb 22, 2019
- Messages
- 229
- Reaction score
- 148
- Age
- 58
as a new I got following error when starting up: "The shared folder 'curt' could not be set up: Shared folder path '/home/curt' does not exist on the host."
I can go further and start the virtual machine up, but then I have a (small) issue:
- my MAC keyboard is an AZERTY - so not easy but can work with it
The rests works perfectly! I see the amazing cornfield and can zoom in/out and use cursors to move around - beautiful quality
Yessss! I want to go ahead!!! I feel like a boy in a candy shop - but still with no wallet to buy anything ;-)
Thanks for the kind words! For a lot of image sets, when you draw the original images together as full original images, the details can really pop. For our use-case here this is important because we are hunting for anomalies in the images (evidence of invasive plants ... often clusters of colored berries, or signs of a vines coiling around a tree trunk, or particularly shaped seed head ... generally things that shouldn't be there.)
Shared folders: virtualbox has the ability to share folders with the host computer. This way you can keep your big image sets on the host and don't need to copy them over to the virtual machine for processing. This lets you keep the virtual machine disk image as trim as possible and not waste too many extra resources. When the virtual machine is powered down you can go to "settings" and then "shared folders". You should see the /home/curt folder setup which obviously wouldn't exist on your pc, but if you mimic that setup with your own path to your images folder, then you can make that appear on the virtual machine. Once you have your own folder setup, you can go ahead and delete /home/curt ... this is something I can't setup ahead of time unfortunately because everyone's computer layout is going to be different. There is a *ton* of online help for oracle virtualbox, so if you run into a question about the virtual machine setup for your particular situation, google is probably going to be a better resource than me.
Once you have your own shared folder setup properly and reboot your virtual machine you can click on "activities" in the upper left corner and then open up the file browser. Your shared folder should show up with the name "sf_something". From the terminal (command line) this will be located under /media/sf_something You will need to know this later when you process your own image sets.
I don't know anything about azerty keyboard layouts ... if there is something straightforward I can do with my project code to make things easier I'm willing to take a look at it.
If you want to reprocess the test data set yourself to see that in action (it will take some time) you could do these steps.
1. from the command line or file browser, remove the entire ~/Source/ImageAnalysis/scripts/ztest/ImageAnalysis directory. For each image set you process, the tools create a subdirectory called ImageAnalysis inside the images folder and all the processing files are stored there. The original images aren't touched. So you can quickly wipe this entire subdirectory to clean up or restart.
2. reprocess the test data set:
cd ~/Source/ImageAnalysis/scripts
./process.py ztest
<wait for a while>
3. when it finishes, look at the results:
./explorer.py ztest
A quick note if you get through all of this and want to jump ahead to your own data sets. These tools know about a few (mostly dji) cameras that I have had a chance to use myself. But if your images are taken with a different variant, the processing script might bomb out at the setup stage. At that point there is a script to help setup a new camera. Let me know if you encounter this and I can walk you through that, or if you send me a sample picture I may be able to add the camera from here.
There are some other potential gotcha's along the way ... certain DJI models don't geotag images with the true gps altitude, but instead use barometer altitude (which can change wildly from day to day.) There must be a time that makes sense, but I haven't been able to figure out when that would be. There is a work around where you can add an option to the processing script to force an initial (estimated) altitude for all your pictures ... but you may need to remember what altitude you flew at and figure out the starting ground altitude. The processing tools need a ball park initial image position estimate to work correctly. If the height is too far off that can cause issues later in the pipeline. If you run into this (maybe you flew with a phantom) I can help walk you through this when you get to that point.
Best regards,
Curt.
OK
- the machine is running in the command prompt (the ZTEST files again to see the stitching)
- In the mean time when I do want to use my testdata (DJI Mavic Pro, but also uses an Inspire 2 and a Yuneec H520 - so need maybe help here?), do I copy the testdata to a new folder in the same one as the ztest location or can I use the commands from my shared folder directly? Currently I just copied my pictures in a YTEST-folder next to the ZTEST but suppose it will increase mike you stated the size of the virtual image??
- camera's used are: Mavic Pro - Inspire 2 (with X5S body+ 2 types of lenses) - Yuneec H520 with E90 camera. Furthermore I use an infrared camera (FLIR 336R) which I mounted underneath the Inspire - not sure if I can make stichting pictures yet with this combination (not tried out yet)
thanks already a lot for your help!
Marc
clolsonus
Well-Known Member
- Joined
- Feb 22, 2019
- Messages
- 229
- Reaction score
- 148
- Age
- 58
OK
- the machine is running in the command prompt (the ZTEST files again to see the stitching)
- In the mean time when I do want to use my testdata (DJI Mavic Pro, but also uses an Inspire 2 and a Yuneec H520 - so need maybe help here?), do I copy the testdata to a new folder in the same one as the ztest location or can I use the commands from my shared folder directly? Currently I just copied my pictures in a YTEST-folder next to the ZTEST but suppose it will increase mike you stated the size of the virtual image??
- camera's used are: Mavic Pro - Inspire 2 (with X5S body+ 2 types of lenses) - Yuneec H520 with E90 camera. Furthermore I use an infrared camera (FLIR 336R) which I mounted underneath the Inspire - not sure if I can make stichting pictures yet with this combination (not tried out yet)
thanks already a lot for your help!
Marc
Hi Marc, the idea is for you to be able to keep your image folders organized however works best for your projects on your host mac. Then using the shared drive feature of virtualbox, you can give the virutal machine access to those folders. Then you can process them directly without needing to copy things back and forth to your virtual machine. The image processing tools just create a subdirectory so the original images aren't ever touched, but it never hurts to have a backup of everything for all the different reasons backups are good.
So for example, maybe you created a shared folder called "myprojects", this would show up on the virtual machine as /media/sf_myprojects/ Now let's say you created an image folder inside myprojects called "mavic-flight1". To create the map you would run:
./process.py /media/sf_myprojects/mavic-flight1
Assuming everything went well, then you could look at the final result with:
./explorer.py /media/sf_myprojects/mavic-flight1
For the other drones it would be similar except possibly we'll need to create the camera config if it's a camera that I haven't seen before. If the flir images are geotagged and we can come up with an approximate camera config, then there's a good chance they will stitch.
Best regards,
Curt.
clolsonus
Well-Known Member
- Joined
- Feb 22, 2019
- Messages
- 229
- Reaction score
- 148
- Age
- 58
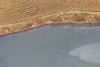
curiosity : your image DJI_0264.jpg in the test: is this water? Colo(u)r is so grey??
Ahhh, that pond is frozen! I did that flight on Nov 24 and my logs say it was +45F at skids up time, but it had been a lot colder than that in previous weeks so all the water around here was frozen at the time.
Attachments


New Posts
-

-

-
-
 Sharing My Music and Sound Effects - Over 2000 Tracks
- Latest: Eric Matyas